Remote Actions for Orchid Extender
The Remote Actions package, and accompanying REMOTEACTION module, are used to integrate Orchid Extender’s Workflow for Sage 300 with fleetingforms.io to securely collect well formatted, validated, data from users or customers from beyond the corporate perimeter.
Quickstart
Want to get up and running with a basic approval form quickly? This guide will walkthough the steps required to add a remote approval to your workflow.
Adding a remote approval to an existing workflow is easy. This is what needs to be done:
- Select or create a Message Template to use for the notification to the user that a remote approval is available.
- Select or create a Message Template to use for the form title and content.
- Identify the Sage users or Extender User Groups that need to receive a notification.
- Identify the actions the user can take and how the buttons for those actions should be labelled.
- Add the
REMOTEACTION.SendApprovalFormEmailaction to your template, providing the email notification Message Template, Users, from content Message Template, and actions as parameters.
That’s all! The next time the workflow is triggered, a remote approval form will be created and the users notified.
Selecting a Notification Template
pass
Selecting a From Content Template
pass
Identifying the Sage Users or Groups
pass
Identifying the Form Actions
pass
Adding the SendApprovalFormEmail Action
pass
Adobe Sign Quickstart
This guide provides a detailed walkthrough of connecting Remote Action to Adobe Sign.
Note
Adobe Sign is supported in Remote Action version 5.1 and newer.
The overall process that needs to be completed to connect Adobe Sign to the Remote Action service is:
- Create an account.
- Create a new API application.
- Perform the initial configuration in Sage.
- Complete the OAuth workflow.
Creating an Account
Remote Actions will connect to the User’s Adobe sign account. The user must create an account before a connection can be established.
For demonstration and testing, a free developer account can be used. All agreements created using a demo account have a watermark applied and cannot be used in production.
To create a new developer account, visit the Adobe Sign Developer Account Sign-Up.
Creating the API Application
An API Application allows a service, like Remote Actions, to obtain a token used to act on a user’s behalf. The application must be created and authorized by the user to obtain tokens. The authorization can be revoked at any time.
To create an API application, sign in to Adobe Sign and take the following steps:
Once you’ve signed in, you will be redirected to your dashboard. The URL will be in the form
https://secure.<shard>.adobesign.com/.... The shard will be a short code likena1,eu2, orap3. Take note of:- Shard:

The shard for this account is na4.
- In the navigation column on the left of the screen, expand Adobe Sign API and open API Applications.
- In the API Applications page, click the + icon to create a new application.
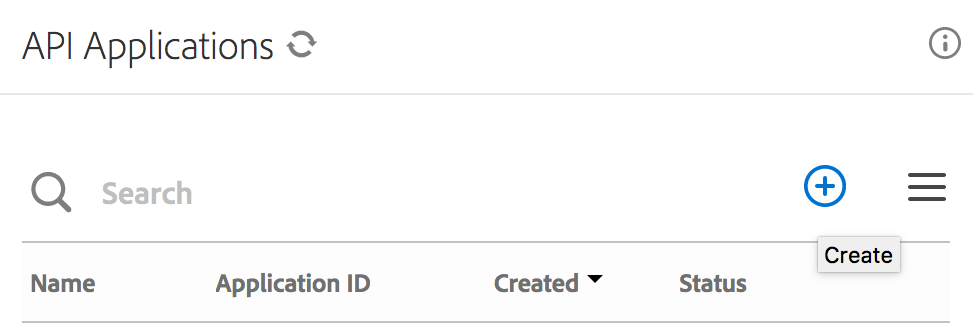
Click the + icon to create a new application.
Create a new CUSTOMER API application.
- Name: remote-action-service-<COMPANY>
- Description: Remote Action - Intergate with Sage 300 - <COMPANY>
- Domain: CUSTOMER
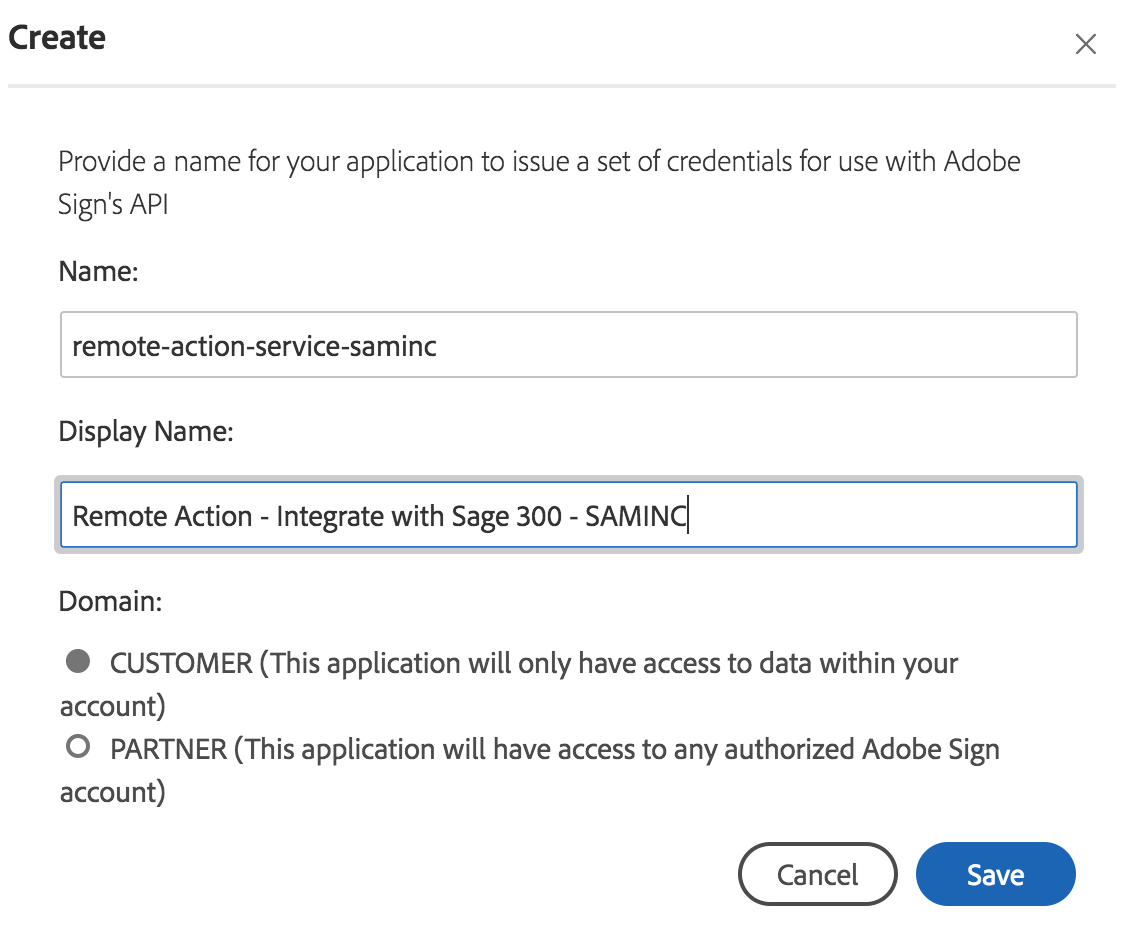
Define a new CUSTOMER API application.
- Once the application has been created, highlight it and select Configure OAuth.
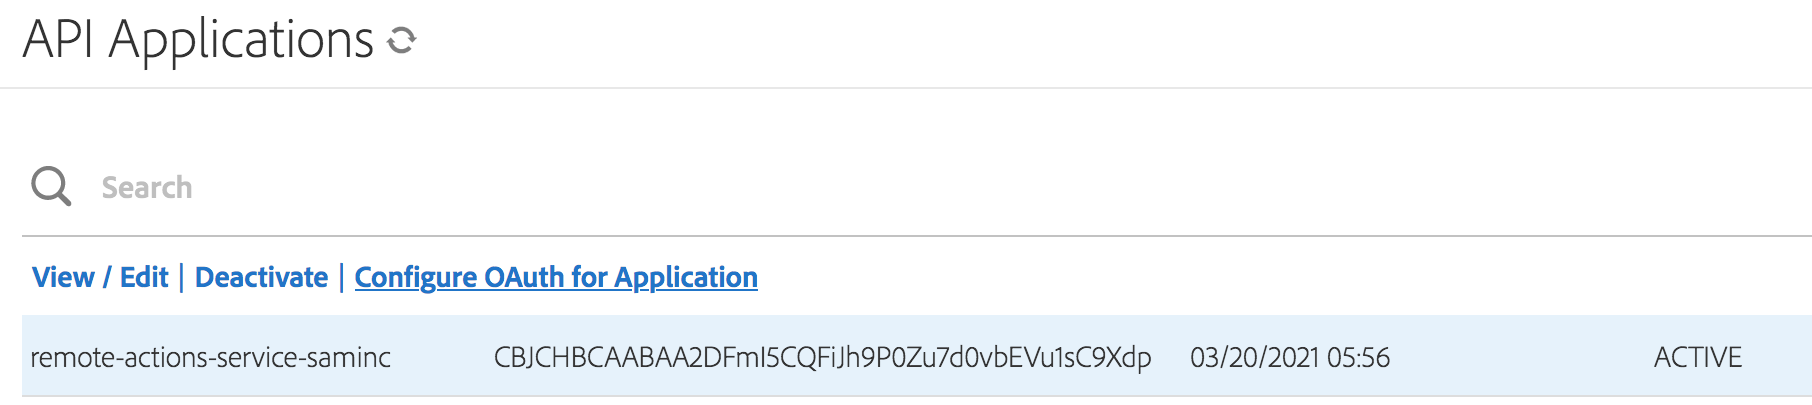
Highlight the new application to reveal Configure OAuth link.
Configure OAuth for the application. Take note of:
- Client ID:
- Client Secret:
Set the following values:
- Redirect URI: https://poplars.dev/adobe-sign-activate.html
- Enable the following OAuth Scopes with the modifier
self:- user_read
- agreement_read
- agreement_write
- agreement_send
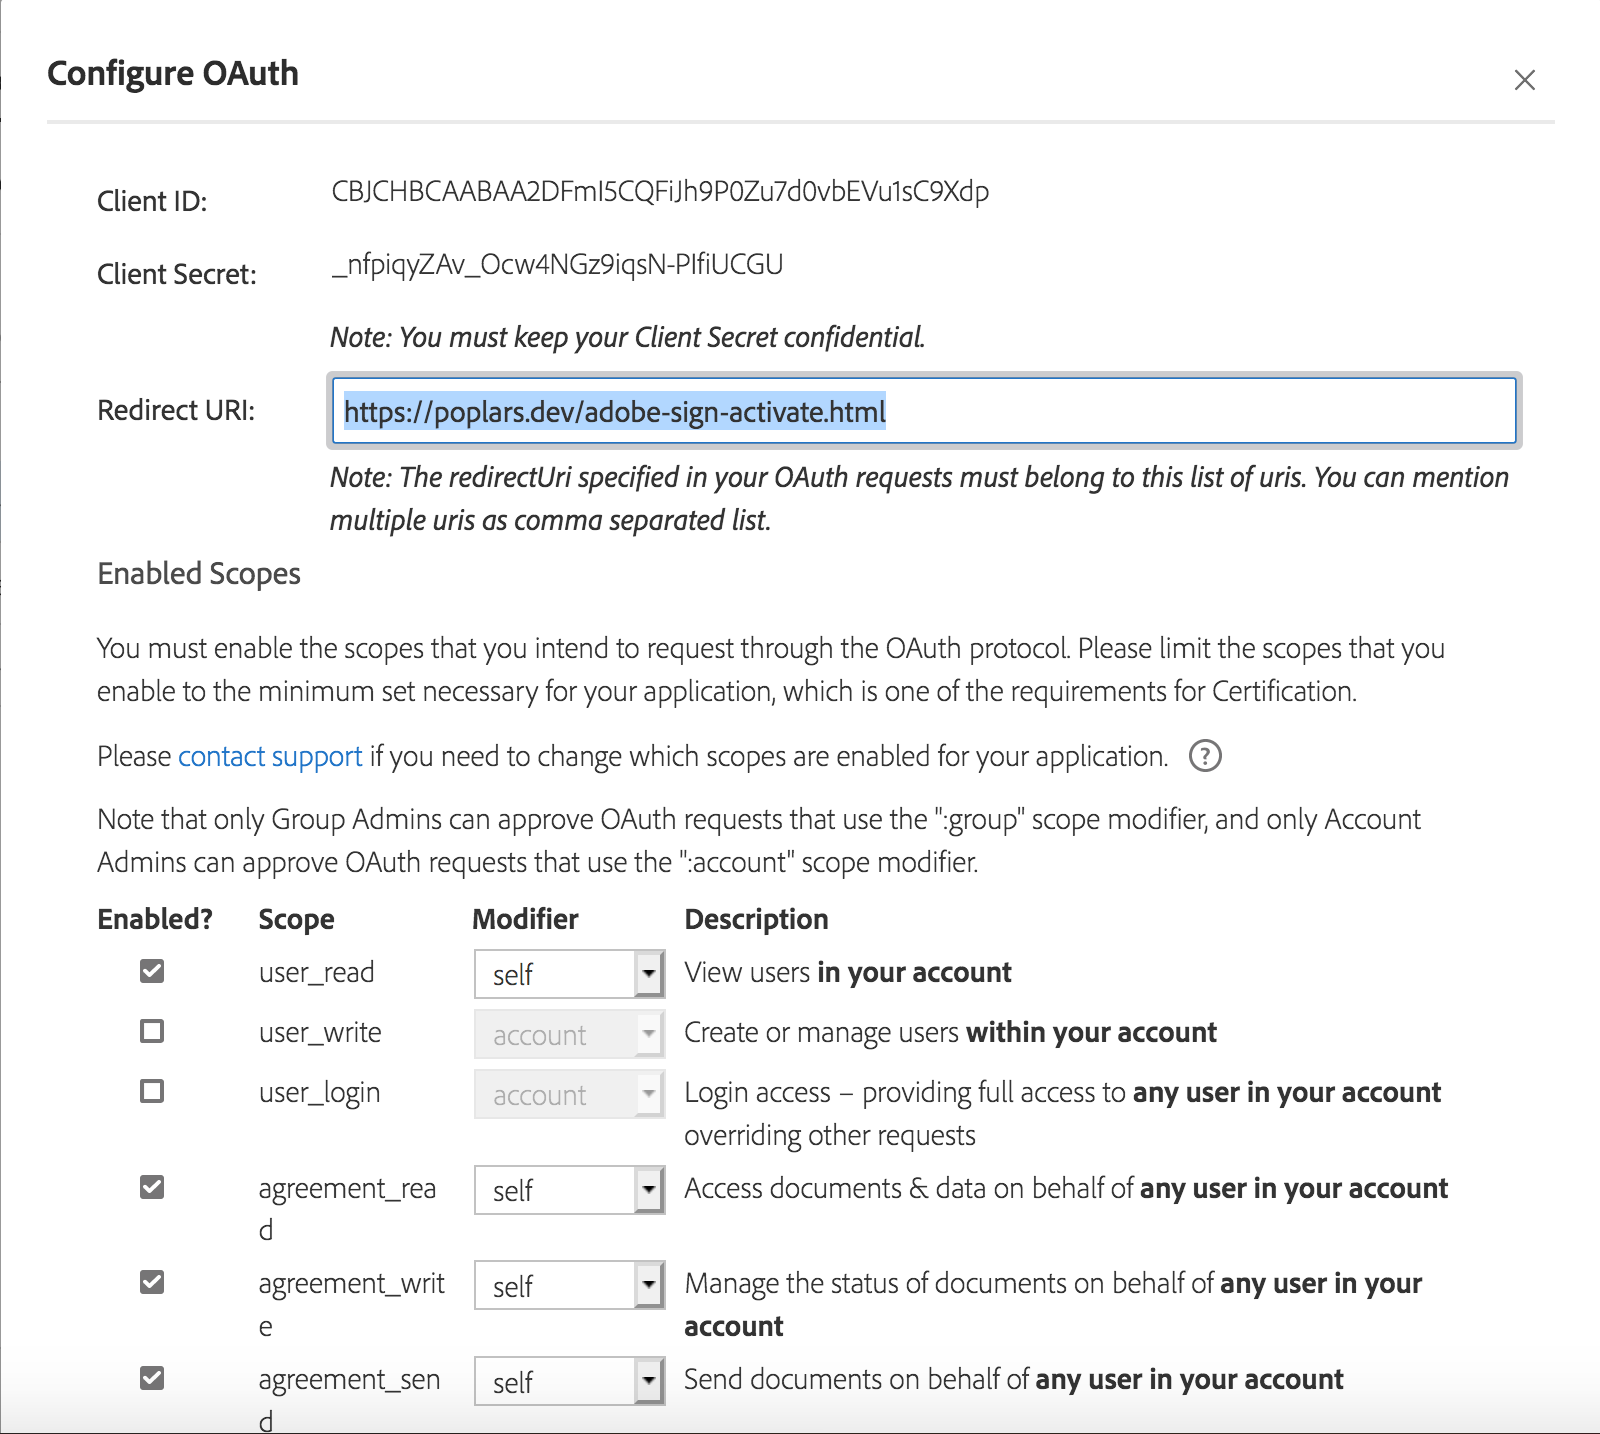
Record the Client ID and Client Secret, set the scopes for self.
- In Sage, start Extender –> Remote Action –> Setup –> Adobe Sign Connect.
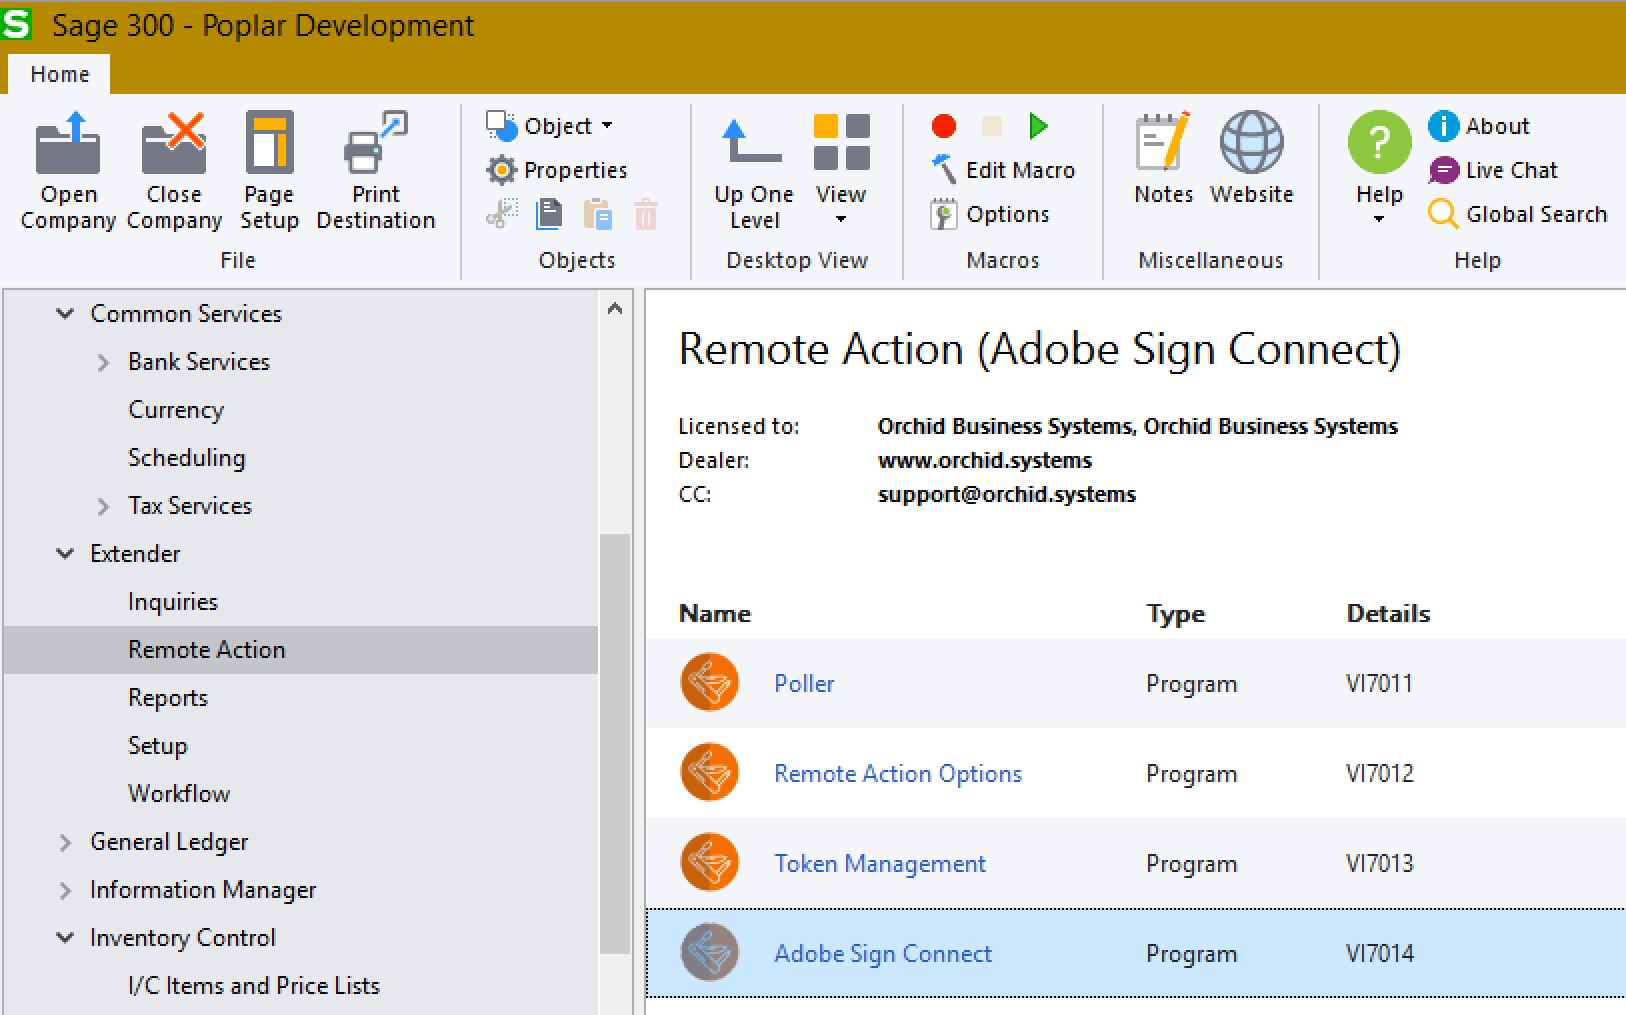
Open the Adobe Sign Connect utility to start connecting Remote Action to your Adobe Sign account.
- Fill in the Shard, Client ID, and Client Secret that you noted in the previous steps. Once filled in, the Authorize button will be enabled.
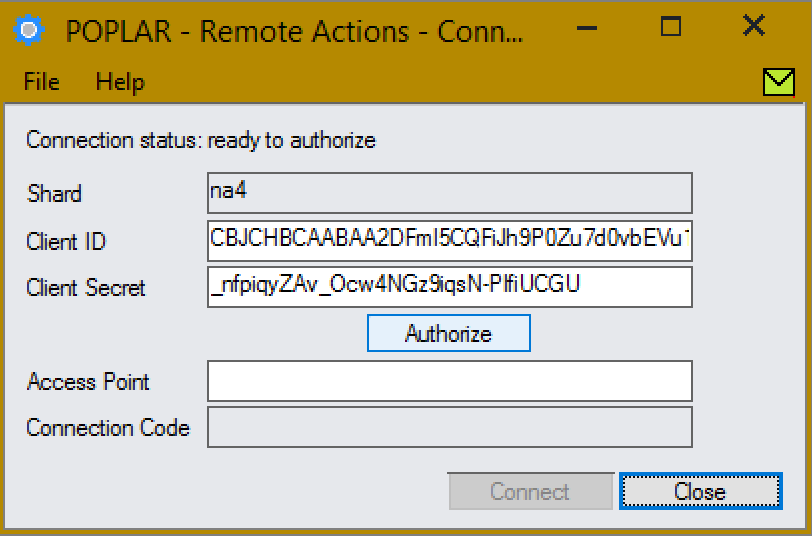
Input the Shard, Client ID, and Client Secret recorded in the previous steps.
Click the Authorize button. A web browser will open, prompt you to sign in and authorize the application to connect to Adobe Sign on your behalf.
After authorizing the application, you will be redirected to the Poplar Development Adobe Sign Connection Confirmation page. This page will display the values required to complete the connection. Take note of:
- Access Point:
- Connection Code:
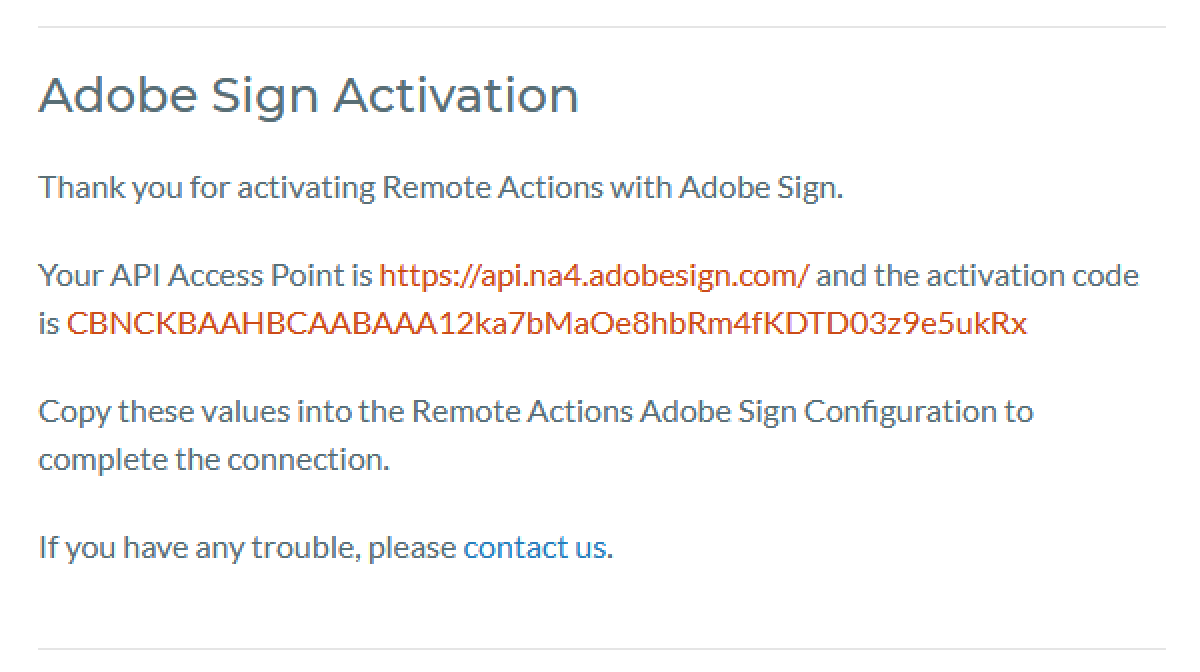
The Poplar Development Adobe Sign Connection Confirmation page displays the Connection Code and API Access point required to complete the connection.
- Input the Access Point and Connection Code into the Adobe Sign Connect screen in Sage. Complete the connection by clicking on the Connect button.
Note
If the access point URL ends with a / it will automatically
be removed.
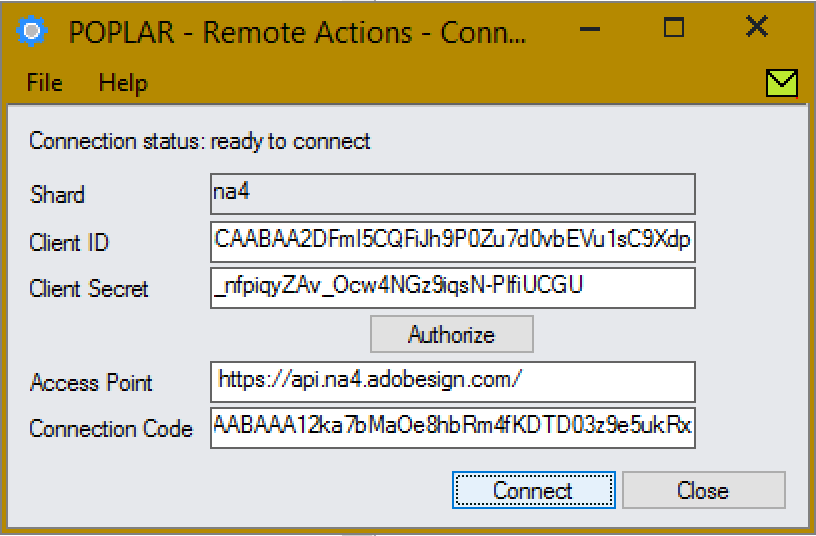
When you click Connect, the process will be completed and a persistent connection established.
- Once connected, the configuration is complete.

When you click Connect, the process will be completed and a persistent connection established.
Leisurely Start
This guide provides a detailed walkthrough of creating a new workflow that leverages remote approvals.
To provide some context, it is built around a specific use case: approving Sale prices for items.
Poller
The poller retrieves completed remote approval forms and applies them to their respective workflows.
The poller can be run manually or using Process Scheduler. Manual execution is helpful while testing and setting up the service but Process Scheduler should be used in production environments.
Running the Poller with Process Scheduler
The poller is designed to be run in the background as a Task managed by the Windows Task Scheduler. This can be accomplished using Process Scheduler.
Setting Up Process Scheduler
Start by creating an email message template that will be sent to an administrator in the event of an error in the poller.
Open the Process Scheduler –> Setup –> E-Mail Messages screen. Create a new Process Scheduler Email Template, setting all the required fields and including the details of the errors in the message body.

With a template created, it is time for a new Schedule. Open the Process Scheduler –> Setup –> Schedules screen. Create a new schedule, setting the Schedul ID, description, and email sending parameters.

In the Schedules screen, create a new line, Step Number 1, the company for which the poller should run, and set the action to Run Extender Script.

Open the line details by selecting Detail… for the current line. Select the REMOTEACTION.poller script and save without any parmeters.

Setting Up the Windows Scheduled Task
With the schedule configured in Process Scheduler, a scheduled task must be created that can be run automatically in the background. To create a new Scheduled Task, start by opening Start –> Windows Administrative Tools –> Task Scheduler.

Right click on the Task Scheduler Library and select Create Task.
Start by defining the task name, User to run the task, and allow the task to run in the background when the user is not log in.

Move on to configure the Triggers. Create a trigger that will fire when the machine is started and every 5 minutes thereafter indefinitely.

Configure the Action that will be performed. Create a new action
that Start a program. The program to start is
OzIntegrityCheck.exe, located in the Sage300\oz6?a\ folder. The
Schedule ID (REMOTEACTIONPOLL in the example) must be provided as
an argument.

Finally, configure a sensible set of options for the task. The task should rarely take longer than a minute to run. In addition to allowing it being run on demand for testing, it should be stopped automatically if it has run for an hour and multiple instances should not run in parallel.

Once the configuration of the task is complete, restart the computer for the schedule to take effect, or start it manually.
REMOTEACTION.poller
Form Client
The form client is a support library that includes the
FormClient class as
well as helper functions that are used across multiple Workflow Actions.
This library is of interest only to those that need to compose custom workflow actions that create, read, or delete approval forms.
Workflow Actions
Included in the Poplar Forms package are a number of workflow actions that can be used to generate and send forms to Sage Users, Extender groups, and client email addresses.
Using Workflow Actions
The workflow actions included with the package can be used in any workflow step. All workflow actions perform the following:
- Render the form content message template.
- Use the rendered content to generate the approval form.
- Obtain the approval form URL and, if necessary, append default values as URL parameters.
- Render and send an email notification to all specified users.
In order to perform these tasks, the actions all accept the following parameters:
Parameter1: Notification Email Template - used to render notification email
template, inserting the {FORMURL} template variable.
Parameter2: To list - Sage Users or Extender Groups to notify of the
approval.
Parameter3: Form Content Template - used to render the form content, the
subject is used as the page title and the content is displayed
above the form. Both plain text and HTML content are
supported.
Parameter4: Button Labels and Progress To steps - a comma separated list of
button_label=progress_to_stepname pairs.
HTML Content in Forms
HTML can be used in form titles and content. Only a subset of HTML tags are
supported ALLOWED_HTML_TAGS.
To use HTML content in a form, create a message template that represents a
valid HTML page (i.e. begins/ends with <html> tags and contains a
<body>).
The following message template will render the customer name in italics, an amount in bold, contains a list, and whitespace management:
<html>
<head></head>
<body>
<p>Customer <i>{IDCUST} {NAMECUST}</i>
has requested a change of credit limit
from {AMTCRLIMT:2} to
<b>{TOVALUE:2}</b>
</p>
<br />
This is a list of things!
<ul>
<li>Thing1</li>
<li>Thing2</li>
<li>Lorax</li>
</ul>
<p>The change was done on {DD}/{MM}/{YYYY} at
{HOUR}:{MINUTE}:{SECOND} by {USER}</p>
</body>
</html>
Customize a Form
Forms are highly customizable! Many different fields types are supported, validations can be applied, and everything in the form template down to the field help text and error messages are easily changed.
Each Workflow Action contains a list of form controls and an action map at the
top of the file after the import statements. By customizing the
form_controls the layout, fields, and actions of a form can be customized.
For a detailed walkthough of creating a new action for a custom Sale Price
approval workflow based on the
SendApprovalFormEmail action
check out the leisurely start guide.
Create a New Workflow Action
The first step to customizing a form is copying one of the existing actions to a new Workflow action file. Because workflow actions are stored in the database, an existing action file cannot be copied to a new file and edited.
One method of creating and registering new workflow actions is to view the file contents from the database and copy them into a new file.
- Open the Extender –> Setup –> Scripts screen.
- Right-click on the script that will be used to build the new action and select View. The action file contents open in a text editor.
- In the text editor, select File –> New.
- Copy the contents of the existing action file to the new file.
- Close the existing file.
- Save the new file with a unique name.
Customize the Form
Each workflow action file included with Poplar Forms has a list of form controls defined at the top of the action file. A form control is a widget that displays a field in the form. The standard approval form template looks something like this:
form_controls = [
{
'name': 'APPROVALCOMMENT',
'type': 'textarea',
'label': 'Comments',
'required': True,
}
]
To customize the form, change the contents of the form_controls variable
to meet your needs.
Need a form with a comment that uses a text field instead of a text area?
Edit the APPROVALCOMMENT form control to be of type text:
form_controls = [
{
'name': 'APPROVALCOMMENT',
'type': 'text',
'label': 'Comments',
'required': True,
}
]
Users sometimes need a nudge, if you want to tell users up front that the comment is required, add some help text to render with the field:
form_controls = [
{
'name': 'APPROVALCOMMENT',
'type': 'text',
'label': 'Comments',
'required': True,
'help_text': 'Comments are required, please leave one.',
}
]
Because Comments are required, perhaps an initial value is in order to save time in the best case:
form_controls = [
{
'name': 'APPROVALCOMMENT',
'type': 'text',
'label': 'Comments',
'required': True,
'help_text': 'Comments are required, please leave one.',
'initial': 'Approved'
}
]
Adding New Controls
Simply define a new element in the form_controls list to add an additional
control to the form.
What if we need a new form to store the maximum number of widgets that are being approved?
form_controls = [
{
'name': 'APPROVALCOMMENT',
'type': 'text',
'label': 'Comments',
'required': True,
'help_text': 'Comments are required, please leave one.',
'initial': 'Approved'
},
{
'name': 'MAXWIDGETS',
'type': 'integer',
'label': 'Maximum Widgets',
'required': True,
'help_text': 'What is the maximum number of widgets being approved?',
'initial': '5432'
}
]
Where’s the Data?
Yes but… where does the data from the new field go? When the
Poller applies a form of type workflow_approval (like this one)
all the fields are set as values in the Workflow itself.
So in the case described above, in the steps following the approval wait step,
the MAXWIDGETS value with be set in the Workflow and can be referenced
as {MAXWIDGETS}.
Progress To Steps and Form Buttons
The buttons displayed at the bottom of the form, and the step that the workflow will progress to when they’re pressed, are passed as the fourth parameter to the workflow action.
They are passed as a comma separated list of button label, progress to step
name pairs. To render three buttons, Allow, Cancel,
Deny that progress to steps Allowed, Canceled, and
Denied, provide the following argument:
Allow=Allowed,Cancel=Canceled,Deny=Denied
Dynamic Initial Values
There are three ways to set initial values in the form. The first is to include
the initial argument to the form control definition at the top of the
action file:
form_controls = [
{
'name': 'mycontrol',
...
'initial': 'my initial value'
}
]
Using this approach, all users of the form will see the same default value, regardless of the state of the workflow or the user accessing the form.
To display a value that changes based on the state of the workflow or views
but is the same for all users, change the call to
create_workflow_approval_form() to include
the initial value as a keyword argument.
Continuing the MAXWIDGETS
example, the initial value can be set to the MAXWIDGETS value in the
workflow values by changing the create form call in our custom action:
# Create the form
try:
title, content = render_title_and_content_for(e.resolve(e.p3), e)
form = create_workflow_approval_form(
e.wi.viworkih.get("WIID"),
form_controls,
title,
content,
actions,
MAXWIDGETS=e.wi.getValue("MAXWIDGETS"))
except Exception as err:
showMessageBox("Failed to create approval form: {}".format(err))
return 1
The final approach is to set a different initial value per user. This is done by customizing the URL parameters in the link sent to each user. If we wanted to provide a different initial value to each user, we can do so before the email is sent:
for (username, email_address) in users:
email = Email()
email.setTo(email_address)
if email.load(e.resolve(e.p1)) == False:
error("Unable to load message template '" + e.p1 + "'")
return 1
user_url = "{}?MAXWIDGETS={}&".format(url, user_max_widgets)
email.replace("FORMURL", user_url)
Note
If more than one approach is used to set the initial value of a form control, only one will be applied.
Initial values set in the form control definition are preferred over those set dynamically.
Initial values set when creating the workflow form are preferred over those set in the URL parameters.
The package contains Workflow actions for Orchid Extender that make it simple to create an approval form that can be completed from any computer, phone, or tablet connected to the internet.
This documentation includes information on using the included Workflow actions to create remote approval forms, setting up the poller, a description of the form client that is used to connect to fleetingforms.io, and instructions on how to customize a form to meet your needs.
If you want to get up and running as quickly as possible, check out the quickstart guide.
Looking for a comprehensive walkthorough of creating a workflow built around a remote approval? Try the leisurelystart.